Pi2jamma hardware and software info
From falz.net
Info

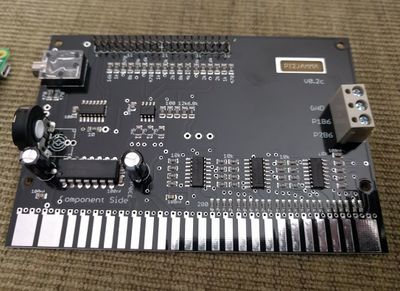
I recently picked up a pi2jamma, which is a JAMMA compatible arcade board made to interface with a Raspberry PI 3. This is in use as an alternate JAMMA board in my Neo Geo Arcade Cabinet.
The other comparable device to this is the RaspberryJAMMA / Arpicade. This uses the HDMI video output and converts to VGA.
Hardware
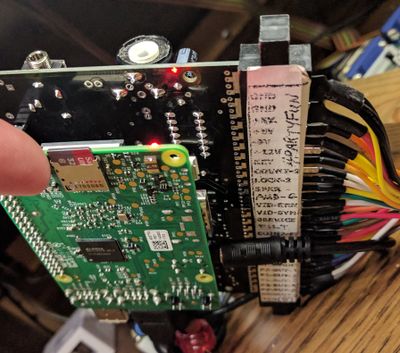
The pi2jamma was created by Jochen Zurborg. Its design is fairly simple, you simply mount the Pi3 on its GPIO pins and connect the audio from the headaphone jack out of the Pi in to the pi2jamma. Power is provided over GPIO, no additional connections are required outside of your JAMMA harness.
it contains these primary components:
- Integrated VGA 666 adapter circuitry which uses GPIO pins 4 - 21 and requires at least a Pi3.
- THS7314 video amp
- LM380N 2.5w audio amp. Audio is fed from 3.5mm input jack
- 3 74LS165 shift registers to allow for a total of 24 inputs over the few remaining GPIO pins (todo: which GPIO pins exactly?). This method is used because there are very few remaining GPIO pins to use. Other JAMMA/Pi solutions that use the pi's build in HDMI port tend to use mk_arcade_joystick_pi.

Software
Regamebox is the official software distribution. Work has been done to make Retropie work as well.
I have been working on porting the Arpicade software (intended for RaspberryJAMMA) which is just changing a few modules and script settings.
Perform these steps with the SD card mounted in your system. Note that all of these paths are relative to the root of where your SD card is mounted:
- modify /boot/config.txt to load VGA666 drviers. This will have a lot of defaults in it, this is the full output of my file after some modifications (todo: finalize settings that I'm happy with):
##############################
#this group is from arpicade
disable_splash=1
disable_overscan=1
#overscan_scale=1
#overscan_left=33
#overscan_right=32
gpu_mem=256

##############################
#this group is from regamebox
#gpu_mem=64
disable_audio_dither=1
dtparam=audio=on
dtoverlay=vga666
enable_dpi_lcd=1
display_default_lcd=1
dpi_group=2
dpi_mode=87
hdmi_timings=320 1 16 30 34 240 1 2 3 22 0 0 0 60 0 6400000 1 #240p
- Disable the mk_arcade_controls GPIO driver by commenting out the contents of /etc/modprobe.d/mk_arcade_joystick.conf. The pi will not boot with this and the vga666 drivers loading.
#options mk_arcade_joystick_rpi map=1,2
First give yourself access to the pi over ssh since you won't initially have functioning video. With the SD card mounted to your PC, create a blank file caled /boot/ssh. Enable wifi driver by commenting the contents of /etc/modprobe.d/raspi-blacklist.conf, and put your SSID/psk combo into /etc/wpa_supplicant/wpa_supplicant.conf:
Comment out these two lines in /etc/modprobe.d/raspi-blacklist.conf to enable wifi modules:
#blacklist brcmfmac
#blacklist brcmutil
Use the wpa-passphrase command from your machine. My PC is linux so it works, sorry I have no idea how to do this on Windows. `wpa_passphrase yourssid hunter22` will spit out this text, which you place at the end of /etc/wpa_supplicant/wpa_supplicant.conf:
network={
	ssid="yourssid"
	#psk="hunter22"
	psk=8a06b4578aa024328c74a94a217fa430b24fdb2d7c6796ce9bae8ff69ed91102
}
At this point you should have a pi that boots and displays video, see if that is indeed the case. If so, Let's do the remaining steps via SSH. Default auth is the same as Raspbian - username: pi, password raspberry. You could su to root and set its password too, I did so and set it as arpicade. All of the remaining steps require you to be root or use sudo.
- Tell the pi to use the analog output for audio instead of HDMI. One can run raspi-config -> Advanced-> Audio or this command at a prompt:
amixer cset numid=3 1
- Copy the pikeyd165 binary and pikeyd165.conf to Arpicade. The conf file must go in /etc/ but the binary can go wherever you'd like. I created a subdir in /etc/ and just tossed them both there:
mkdir /etc/regamebox/
ln -s /etc/regamebox/pikeyd165.conf /etc/pikeyd165.conf
It should look something like this:
 root@raspberrypi:/etc# ls -alh /etc/pikeyd165.conf
 lrwxrwxrwx 1 root root 29 Dec 29 17:26 /etc/pikeyd165.conf -> /etc/regamebox/pikeyd165.conf

root@raspberrypi:/etc# ls -alh /etc/regamebox/
-rwxr-xr-x  1 root root  35K Dec 29 17:25 pikeyd165
-rw-r--r--  1 root root 1.4K Dec 30 10:46 pikeyd165.conf
- Tell pikeyd165 to start at boot by creating/updating a service. Create the file /etc/init.d/pikeyd165 with these contents:
#!/bin/sh
### BEGIN INIT INFO
# Provides:          pikeyd165
# Required-Start:	$local_fs
# Required-Stop:	$local_fs
# Should-Start:
# Default-Start:     2 3 4 5
# Default-Stop:
# Short-Description: rpi GPIO keyboard controller
# Description:       Originates from regamebox
### END INIT INFO

PATH=/sbin:/usr/sbin:/bin:/usr/bin
. /lib/init/vars.sh

do_start () {
	/etc/regamebox/pikeyd165 -smi -ndb -d
}

case "$1" in
  start|"")
	do_start
	;;
  restart|reload|force-reload)
	echo "Error: argument '$1' not supported" >&2
	exit 3
	;;
  stop)
	killall pikeyd165
	;;
  *)
	echo "Usage: motd [start|stop|status]" >&2
	exit 3
	;;
esac
:
- Tell debian to start the service upon boot:
update-rc.d pikeyd165 defaults
update-rc.d pikeyd165 enable
- Modify pikeyd165.conf for any required button mappings. By default it is coded to work with MAME's defaults, but may not have buttons mapped to escape out of a game back to your frontend. At bare minimum I've uncommented the 'quit emulator/game' section which maps to 1p start (10) + 1p button 1 (17):
KEY_ESC        17 10
# todo: fix p2 coin mapping
At this point you should have a functional Arpicade image on pi2jamma. Note that all of these things should work equally on a fresh Raspbian install as well, you'll just have to do extra work to get a frontend to work. Arpicade uses the Attract Mode frontend by default.
Other optional tweaks I made were:
- tell Attract Mode to always stay 240p (not 480i) after leaving a game by modifying the end of each file in /boot/launchers/*.sh and commenting this section out at the very bottom:
#tvservice -e "CEA 6 HDMI" & sleep 3
#fbset -depth 8
#fbset -g 720 480 720 480 16